This is the Debian version of the previous tutorial: (Setup a minimal LAMP server for LogAnalyzer on CentOS-8) which aims to centralize all your devices logs at one place (or more if you want to) in order to view and analyze them all in a single UI.
Notes:
And as usual, you want to login as root with su -, or prefix all of the following commands with sudo.
We wrote a BASH script to automate all of the below:
If you want to use it, instead of doing everything yourself, execute the following commands. Otherwise, jump to the installation section.
root@debian10:~# apt update ; apt install -y git
root@debian10:~# git clone https://gitlab.com/unix.cafe/loganalyzer.git
root@debian10:~# cd loganalyzer ; git checkout Debian-10 ; bash debian10-setup.sh
Installation:
As always let’s make sure our server is up to date:
root@debian10:~# apt update && apt upgrade -y
We need to add the buster-backports repository, in order to solve the dependency issue with php-twig package when we try to install phpmyadmin, so let’s do it:
root@debian10:~# echo 'deb http://deb.debian.org/debian buster-backports main contrib non-free' > /etc/apt/sources.list.d/backports.list && apt update
Then we need to install the needed packages:
root@debian10:~# apt install -y mariadb-client mariadb-server apache2 php libapache2-mod-php php-gd php-mysql
root@debian10:~# apt install -y rsyslog-mysql ; apt -t buster-backports install php-twig -y
root@debian10:~# apt install -y phpmyadmin
Let’s make sure that the Apache and MariaDB are enabled and started:
root@debian10:~# systemctl enable --now apache2.service
root@debian10:~# systemctl enable --now mariadb.service
Configuring rsyslog:
First, let’s backup the configuration file, in case of we screwed things:
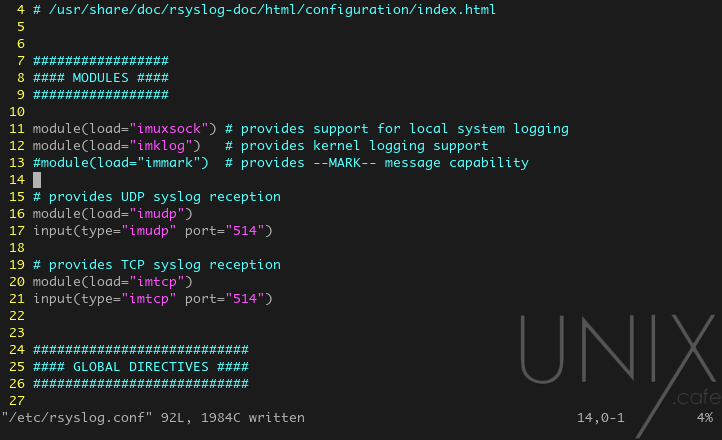
root@debian10:~# cp -p /etc/rsyslog.conf{,.def}In this point, we need to tell rsyslog to receive the submitted logs from our devices on port 514 for both protocols TCP and UDP. So, let’s edit the file: /etc/rsyslog.conf:

Now we need to un-comment the above lines: 16, 17, 20 and 21, to become as:

Now, we need to restart the rsyslog service:
root@debian10:~# systemctl restart rsyslog.service
Creating the needed MariaDB’s database and user:
When we installed rsyslog-mysql it created a database called “Syslog” as well as the user “rsyslog“. So, we need to create a database for the LogAnalyzer, and grant all permission to the user “rsyslog” on “Syslog” and “Loganalyzer” databases. Let’s do it:
root@debian10:~# mariadb -u root -e "CREATE DATABASE IF NOT EXISTS Loganalyzer;"
root@debian10:~# mariadb -u root -e "GRANT ALL ON Syslog.* TO 'rsyslog'@'localhost';"
root@debian10:~# mariadb -u root -e "GRANT ALL ON Loganalyzer.* TO 'rsyslog'@'localhost';"
root@debian10:~# mariadb -u root -e "FLUSH PRIVILEGES;"
Switching to ‘mysql_native_password’ for “root” user in MariaDB:
By default Debian uses “unix_socket” plugin to authenticate login to MariaDB as “root“. Which allows you to login to MariaDB from terminal without the need of entering any password as long as you are logged-in with “root“. In other words, if you have a terminal session with “root” privileges, you can login as “root“ user to MariaDB without any passwords. Yet you cannot use the MariaDB “root” user to login via phpMyAdmin. Since it requires a password to authenticate against.
If you still want to use “unix_socket“, you can just ignore the following and jump to “Configuring the firewall” section. If not, you may want to execute the following commands (do not forget to replace toor with the password you’d like to use for “root” account):
root@debian10:~# mariadb -u root -e 'UPDATE mysql.user SET plugin = "mysql_native_password" WHERE User = "root";'
root@debian10:~# mariadb -u root -e "ALTER USER 'root'@'localhost' IDENTIFIED BY 'toor';"
root@debian10:~# mysql_secure_installation
Now let’s restart our MariaDB server:
root@debian10:~# systemctl restart mariadb.service
Configuring the firewall:
Debian doesn’t come with a pre-installed firewall frontend. However, the preferred one in Debian derivatives is ufw (Uncomplicated FireWall). If you don’t wish to use a firewall, feel free to jump to “Downloading & preparing LogAnalyzer for the installation” section. Otherwise, go ahead and install ufw:
root@debian10:~# apt install -y ufw
Let’s enable it:
root@debian10:~# systemctl enable --now ufw.service
root@debian10:~# ufw enable
Now we need to inform our firewall that we want to be able to receive connections on HTTP, HTTPS, SSH, 514/tcp and 514/udp:
root@debian10:~# ufw allow in "WWW Full" comment 'http & https'
root@debian10:~# ufw allow in SSH
root@debian10:~# ufw allow in 514/tcp comment 'rsyslog (tcp)'
root@debian10:~# ufw allow in 514/udp comment 'rsyslog (udp)'
root@debian10:~# ufw reload
Downloading & preparing LogAnalyzer for the installation:
Since, I could never get the loganalyzer package in the Debian’s repository to work properly, we may need to manually download it, then extract it to the right folder.
root@debian10:~# wget http://download.adiscon.com/loganalyzer/loganalyzer-4.1.10.tar.gz -P /tmp
root@debian10:~# tar -xzvf /tmp/loganalyzer-*.tar.gz -C /tmp/
root@debian10:~# mkdir /var/www/html/loganalyzer
root@debian10:~# cp -pr /tmp/loganalyzer-*/src/ /var/www/html/loganalyzer
root@debian10:~# cp -p /tmp/loganalyzer-*/contrib/configure.sh /var/www/html/loganalyzer
root@debian10:~# cd /var/www/html/loganalyzer
root@debian10:/var/www/html/loganalyzer# bash configure.sh
Now, let’s visit http://your-server-ip/loganalyzer, and start the installation process.
Just remember:
In step 3:
- Enable User Database: yes
- Database Host: localhost
- Port: 3306
- Database Name: Loganalyzer
- Table prefix:
- Database User: rsyslog
- Database Password: (whatever you’ve chosen)
In step 7:
- Source Type: MYSQL Native
- Select View: Syslog Fields
- Table type: MonitorWare
- Database Host: localhost
- Database Name: Syslog
- Database Tablename: SystemEvents
- Database User: rsyslog
- Database Password: (whatever you’ve chosen)
- Enable Row Counting: yes
Or use our BASH script to automate all of the above:
root@debian10:~# apt update ; apt install -y git
root@debian10:~# git clone https://gitlab.com/unix.cafe/loganalyzer.git
root@debian10:~# cd loganalyzer ; git checkout Debian-10 ; bash debian10-setup.sh
Happy Debian-ing 😎