Instead of analyzing each device/server’s logs individually from many places, why don’t you store all logs to one (or more) database, so that you can view and analyze them from a single UI?
Notes:
If you’re using a fresh installation of CentOS 8-Stream (020200629) the server or minimal edition, your ethernet-interface might just be down. To identify its name, type: ip ad sh, once you know the interface name (assume it’s enp0s8), bring it up by: ifup enp0s8. And to bring it up automatically every time the server boots, edit the file: /etc/sysconfig/network-scripts/ifcfg-enp0s8 and replace ONBOOT=no with ONBOOT="yes".
And as usual, you want to login as root with su -, or prefix all of the following commands with sudo.
We wrote a BASH script to automate all of the below:
If you want to use it, instead of doing everything yourself, execute the following commands. Otherwise, jump to the installation section.
[root@centos8 ~]# git clone https://gitlab.com/unix.cafe/loganalyzer.git
[root@centos8 ~]# cd loganalyzer ; git checkout CentOS-8
[root@centos8 ~]# bash centos8-setup.sh
Installation:
As always let’s make sure our server is up to date:
[root@centos8 ~]# dnf --refresh update -y
Now, let’s install the EPEL repository:
[root@centos8 ~]# dnf install -y https://dl.fedoraproject.org/pub/epel/epel-release-latest-8.noarch.rpm
[root@centos8 ~]# dnf update -y
Then, we need to install the needed packages:
[root@centos8 ~]# dnf install -y mariadb mariadb-server rsyslog-mysql httpd php php-mysqlnd php-gd
Now, we need to have the remi repository installed, in order to install phpMyAdmin from a repository (this way, the maintainer would take care of its updates for us). And since we don’t want to cause any future conflicts between packages/dependencies, we’re going to disable it.
[root@centos8 ~]# dnf install -y http://rpms.remirepo.net/enterprise/remi-release-8.rpm
[root@centos8 ~]# dnf config-manager --set-disabled remi-modular remi-safe
[root@centos8 ~]# dnf install phpMyAdmin --enablerepo=remi -y
Let’s enable and start Apache and MariaDB:
[root@centos8 ~]# systemctl enable --now httpd.service
[root@centos8 ~]# systemctl enable --now mariadb.service
Creating the needed MariaDB’s databases and user:
Let’s assume the password we’re going to use for our rsyslog user is: PASSWORD. Now, if this is a fresh installation of MariaDB copy and past the following sql statements. If you already have a password for the root account on MariaDB use the flag -p with each of the next commands.
[root@centos8 ~]# mysql -u root < /usr/share/doc/rsyslog/mysql-createDB.sql
[root@centos8 ~]# mysql -u root -e 'CREATE DATABASE IF NOT EXISTS Loganalyzer;'
[root@centos8 ~]# mysql -u root -e "GRANT ALL ON Syslog.* TO 'rsyslog'@'localhost' IDENTIFIED BY 'PASSWORD';"
[root@centos8 ~]# mysql -u root -e 'GRANT ALL ON Loganalyzer.* TO "rsyslog"@"localhost";'
[root@centos8 ~]# mysql -u root -e 'FLUSH PRIVILEGES;'
Securing MariaDB:
In this point, you may want to secure your database server, by assigning a password for root account, and disallow it to login remotely.
[root@centos8 ~]# mysql_secure_installation
Configuring rsyslog:
First, let’s backup the configuration file, in case of we screwed things:
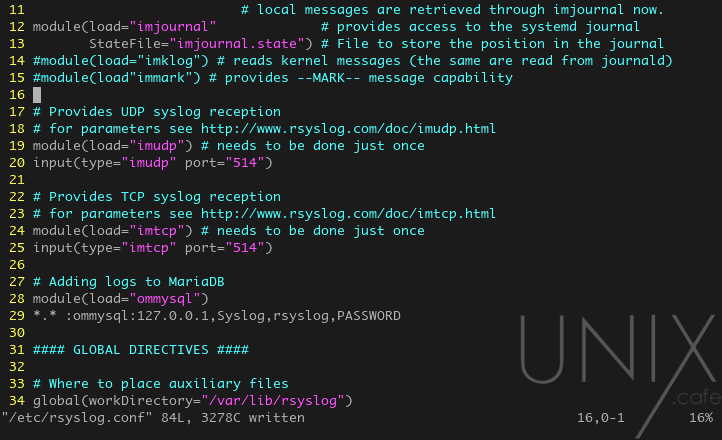
[root@centos8 ~]# cp -p /etc/rsyslog.conf{,.def}In this point, we need to tell rsyslog to receive submitted logs from our devices on port 514 for both protocols TCP and UDP. So, let’s edit the file: /etc/rsyslog.conf:

Now we need to un-comment the above lines: 19, 20, 24 and 25, to become as:

Great, now we also need to configure it to store those logs in our MariaDB‘s database. (which called Syslog), by adding the following code to it:
# Adding logs to MariaDB
module(load="ommysql")
*.* :ommysql:127.0.0.1,Syslog,rsyslog,PASSWORD
To become like this: (lines 27-29)

Now, we need to restart the rsyslog service:
[root@centos8 ~]# systemctl restart rsyslog.service
Configuring phpMyAdmin:
Now, let’s edit /etc/httpd/conf.d/phpMyAdmin.conf:

We need to add the following code between <Directory /usr/share/phpMyAdmin/> and </Directory>:
   <IfModule mod_authz_core.c>
     #Apache 2.4
     <RequireAny>
       Require all granted
     </RequireAny>
   </IfModule>
   <IfModule !mod_authz_core.c>
     # Apache 2.2
     Order Deny,Allow
     Deny from All
     Allow from 127.0.0.1
     Allow from ::1
   </IfModule>
So, the file becomes as:

We need now to inform Apache about our new phpMyAdmin configuration, by restarting it:
[root@centos8 ~]# systemctl restart httpd.service
Configuring the firewall:
Now we need to inform our firewall that we want to be receiving connections on HTTP, HTTPS and 514. And since there is no service in FirewallD for rsyslog, we’re going to create it:
[root@centos8 ~]# firewall-cmd --permanent --new-service=rsyslog
[root@centos8 ~]# firewall-cmd --permanent --service=rsyslog --set-description="Rsyslog Listener Service"
[root@centos8 ~]# firewall-cmd --permanent --service=rsyslog --set-short=rsyslog
[root@centos8 ~]# firewall-cmd --permanent --service=rsyslog --add-port=514/{tcp,udp}
[root@centos8 ~]# firewall-cmd --permanent --add-service={http,https,rsyslog}
[root@centos8 ~]# firewall-cmd --reload
Downloading & preparing LogAnalyzer for the installation:
Since, there is no package for LogAnalyzer in our repositories, we may need to manually download it, then extract it to the right folder.
[root@centos8 ~]# wget http://download.adiscon.com/loganalyzer/loganalyzer-4.1.10.tar.gz -P /tmp
[root@centos8 ~]# tar -xzvf /tmp/loganalyzer-*.tar.gz -C /tmp/
[root@centos8 ~]# mkdir /var/www/html/loganalyzer
[root@centos8 ~]# cp -pr /tmp/loganalyzer-/src/ /var/www/html/loganalyzer
[root@centos8 ~]# cp -p /tmp/loganalyzer-*/contrib/configure.sh /var/www/html/loganalyzer
[root@centos8 ~]# cd /var/www/html/loganalyzer
[root@centos8 /var/www/html/loganalyzer]# bash configure.sh
[root@centos8 /var/www/html/loganalyzer]# chcon -h -t httpd_sys_script_rw_t config.php
Now, let’s visit http://your-server-ip/loganalyzer, and start the installation process.
Just remember:
In step 3:
- Enable User Database: yes
- Database Host: localhost
- Port: 3306
- Database Name: Loganalyzer
- Table prefix:
- Database User: rsyslog
- Database Password: PASSWORD (or whatever you’ve chosen)
In step 7:
- Source Type: MYSQL Native
- Select View: Syslog Fields
- Table type: MonitorWare
- Database Host: localhost
- Database Name: Syslog
- Database Tablename: SystemEvents
- Database User: rsyslog
- Database Password: PASSWORD (or whatever you’ve chosen)
- Enable Row Counting: yes
Or use our BASH script to automate all of the above:
[root@centos8 ~]# git clone https://gitlab.com/unix.cafe/loganalyzer.git
[root@centos8 ~]# cd loganalyzer ; git checkout CentOS-8
[root@centos8 ~]# bash centos8-setup.sh
Happy CentOS-ing 😎